Astra Pro is a powerful WordPress theme,Suitable for all types of websites。Astra Pro usage tutorial will guide you through the installation of Astra Pro、The process of configuring and using some important functions。Astra Pro is the paid version of the Astra theme。If you need to use the paid version,need firstOfficial website purchase。Or use the free version first,Need to upgrade before purchasing。
The difference between Astra and Astra Pro
The paid version of Astra theme includes Astra theme and several paid plugins,And the Astra theme itself is free。These paid plugins extend the Astra theme’s advanced features。Astra paid version has three plans,Astra Pro、Essential Bundle和Growth Bundle。Growth Bundle has the most comprehensive functions,You can buy it as needed。
Astra Addon(Astra Pro Package):Enhanced appearance option configuration of Astra theme,including color、background、font、blog、menu、navigation、Return to top and store enhanced configurations。
Premium Starter Templates plugin(Essential Bundle Package):Paid website templates provided,Can help users quickly build a website with professional appearance and functionality。
Ultimate Addons for Elementor plugins(Growth Bundle):This is an extension element of Elementor,After installation, you can find more element blocks when editing the page in Elementor,Enhanced editor functionality。After installing this plugin,The interface will prompt you to install the Elementor plug-in.,You can directly click the prompt button to install。
Astra Pro Advantages
Astra Pro is a popular WordPress theme,It is developed by Brainstorm Force。This theme is designed to provide users with a flexible、Easy to use platform,For creating professional looking and functional websites。Astra Pro theme comes with many advantages,These include:
Fast loading speed:Astra Pro theme is a lightweight theme,So it loads very fast,This helps improve user experience and SEO rankings。
Design flexibility:Astra Pro theme offers multiple design options,Easily customize the look and feel of your website,including color、layout、Fonts etc.。
Extensive integration:Astra Pro theme is compatible with many popular WordPress plugins,Includes WooCommerce、Elementor、Beaver Builder etc.,These plug-ins help users enhance the functionality and features of their website。
Responsive design:Astra Pro theme is responsively designed,Can adapt to various device sizes,including desktop、Tablets and mobile devices。
SEO friendly:Astra Pro theme uses standard HTML and CSS code,This helps improve your website’s SEO ranking。
In general,Astra Pro theme is a fully featured、Easy to use、WordPress themes with flexibility,Suitable for all types of websites,including business、blog、E-commerce, etc.。
Install Astra Pro
first,You need to install Astra theme and Astra Pro plugin on WordPress。Please follow the steps below:
1、Log in to your WordPress backend。
2、Go to Appearance > theme,Then click Add New。
3、Search "Astra",Find the Astra theme and click Install,Then click enable。

4、Log in to the account backend where you purchased Astra Pro,Download Astra Pro Addon Plugin,Go to "Plugins" > Add Plugin > Upload Plugin,Install and click Enable。

5、In the settings page of the Astra Pro plug-in,Enter yourLicense keyto activate the plugin。

Import a pre-made website
Astra Pro offers many pre-made website templates,Can help you quickly build a website。To import a pre-made website,Please follow the steps below:
1、Log in to the account backend where you purchased Astra Pro,Download Premium Starter Templates,Go to "Plugins" > Add Plugin > Upload Plugin,Install and click Enable。

Or search "starter templates" in the plug-in center to install the free version.,Make sure the author is Brainstorm Force。There are no paid theme options in the free version。

2、Appearance》Starter Templates

3、Click "Build Your Website Now"

2、Choose your preferred website builder,For example Elementor、Beaver Builder 或 Blocker Editor。It is recommended to use Elementor,Elementor is one of the most popular website builders out there。You can also check out aboutElementor tutorials。

3、Browse the library of pre-made websites,Select a template and click Preview。It's marked PREMIUM in the upper right corner,You need to install the Premium Starter Templates plug-in to use it.。

4、On the preview page,Click to import website,Then wait for the import process to complete。After selecting the template,You can upload your logo and set its display width,If there is no logo,You can upload it later,Let's click the button to continue。

Then,We can choose color schemes and fonts,If you still can't make up your mind now,You can change it later,Click button to continue。

The figure below,4 options are checked by default:Import the website's appearance style settings (customizer setting)、Import widgets (widgets,Usually used for sidebars)、import content(content,For example, articles、product),Share non-sensitive information with topic officials,But for novices,My suggestion is to keep the default settings,Click button to submit。

Next we wait quietly for the website to be imported,Don’t close the web page。

When you see this interface, the installation is successful.。

at last,Plugins section in WordPress backend,Disable and delete some plug-ins that are not related to foreign trade website building。
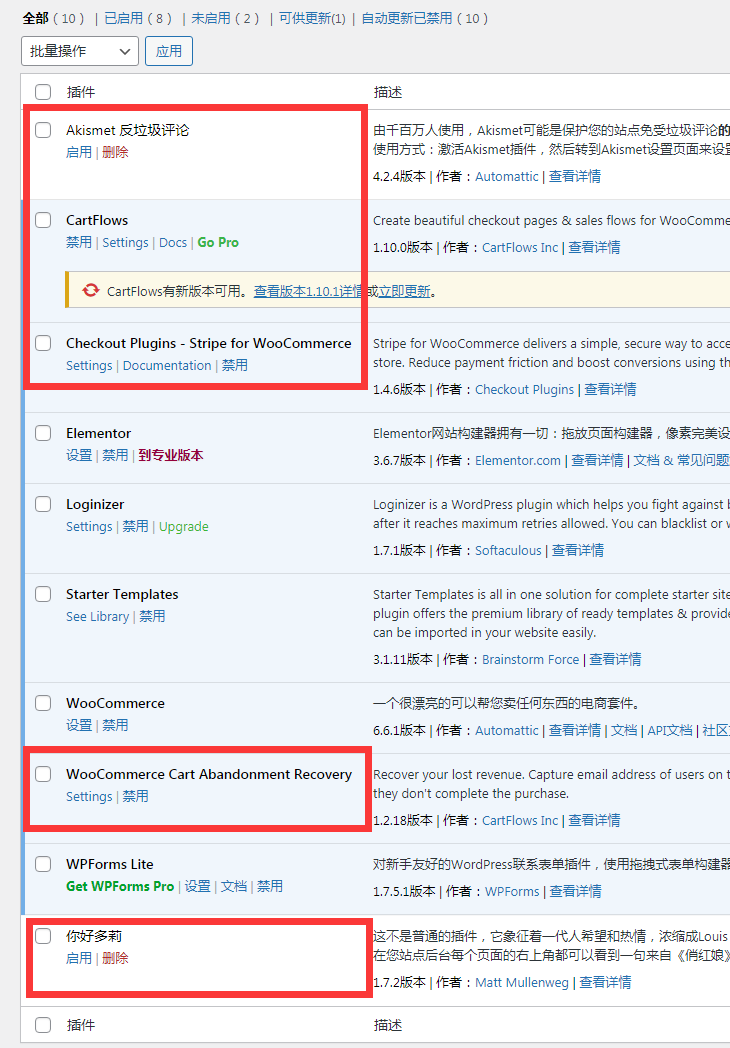
After template import,A European and American style、Rich content、The prototype of a powerful website has emerged,But it is not yet a foreign trade website in the true sense.。Next,We will customize the website based on the template,Further improve foreign trade website building。
Custom Header and Footer
Custom Header
Header is the first place that needs to be customized,It's at the top of the website,Manage website logo,Site navigation,buttons etc.,The customization method is as follows。
1、Go to appearance > customize。

2、Click on "Site Identity",Then click "Website Title and Logo Settings"。Can change website LOGO and site title。

Slide down,We can also see where the subtitle and site icon are set。The site icon will be displayed in the browser tab。

3、Use the menu bar on the left,Browse the various settings options,For example layout、color、font、background etc.。Adjust these settings to suit your needs,and preview changes in real time。When you are satisfied with the settings,Click Publish to save changes。
Set top fixed navigation method
in web design,Fixed navigation is a very common practice,Pin the navigation menu to the top of the page,No matter which screen the visitor scrolls to,You can easily click on the link on the menu,Next, let’s talk about how to set up a fixed header navigation bar in the Astra theme.
Open Appearance – Astra Options,Enable fixed header module

Then open custom options,Go to the page header – Sticky Header
Customized Footer
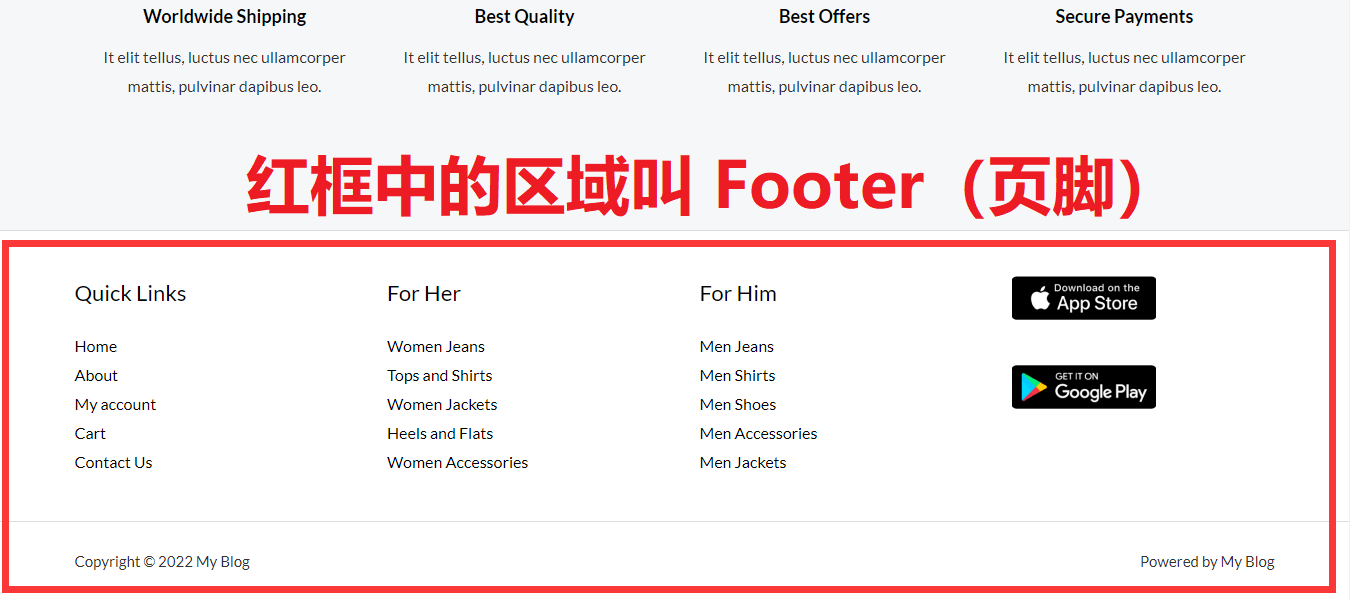
The footer is the second place that needs to be modified,It's at the very bottom of the entire website,Manages website links,Copyright information, etc.。
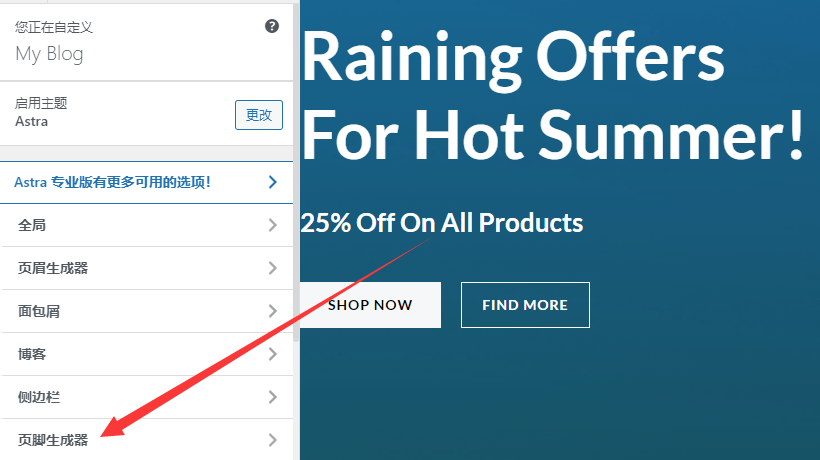
first,Enter the custom editing page through "Customize",Find the edit box of the footer generator。


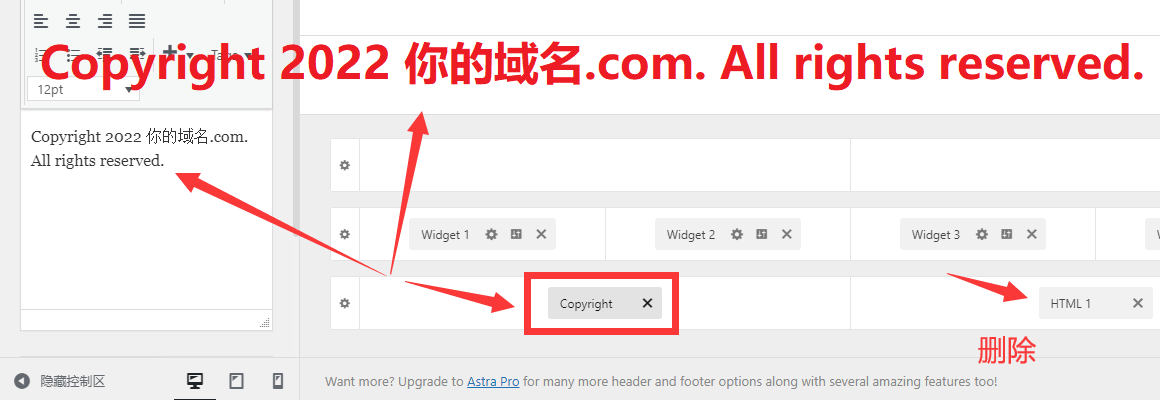
Next,Replace the footer copyright information with your own,The correct format and writing method are as follows。
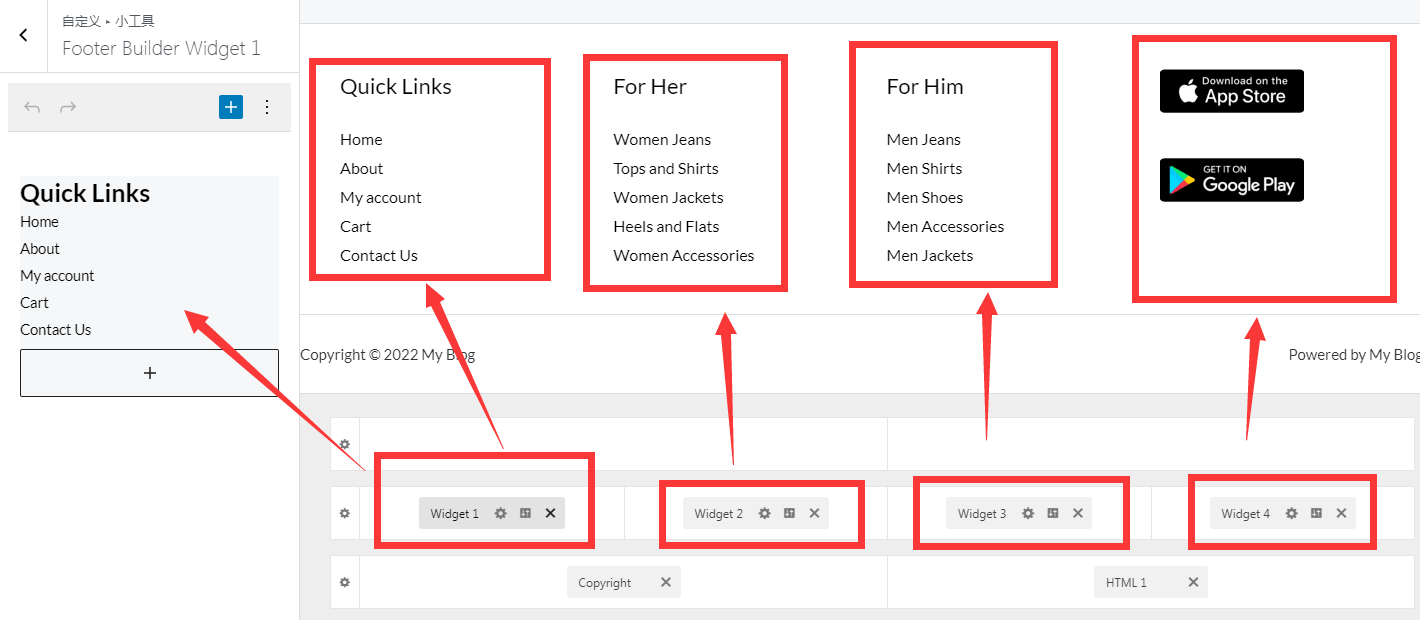
Then,Click on the Widget in the footer,Replace the contents one by one,It can be a text description,Also a website link。
Configure layout and color options
Astra Pro offers rich layout and color options。To configure these options,Please follow the steps below:
1、Go to Appearance > customize > overall situation。
2、Select the global section you want to configure,For example font style、color、container、Buttons and other settings。
3、Adjust settings to suit your needs。

Set up navigation menu
To set up a navigation menu,Please follow the steps below:
1、Go to Appearance > menu。

2、Click Create New Menu,Name the menu,Then click Create Menu。
3、Use the menu item selector on the left,Change the page、Add categories, etc. to the menu。
4、Drag menu items to adjust order and hierarchy。
5、In the menu settings area,Select where you want the menu to appear (such as the main navigation、header or footer)。
6、Click Save menu to save changes。

Customize Product product page
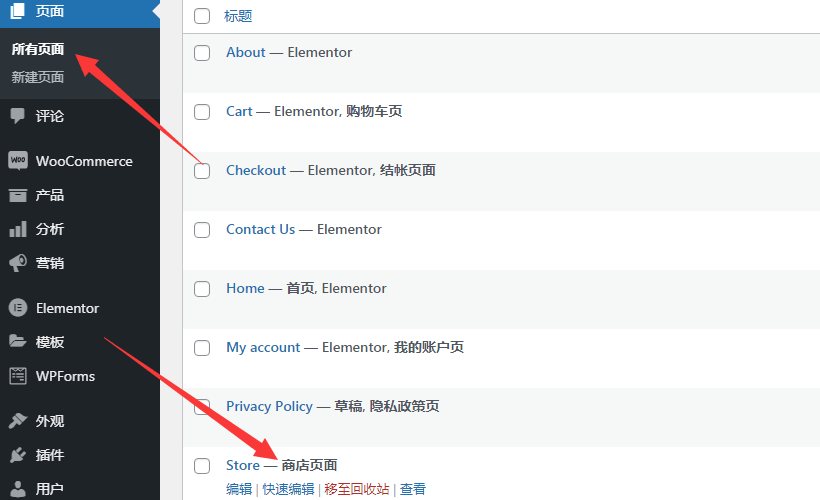
Product pages will use some customization options from WooCommerce and Astra。first,Find the Store page,Via quick edit option,Replace its name with Products。

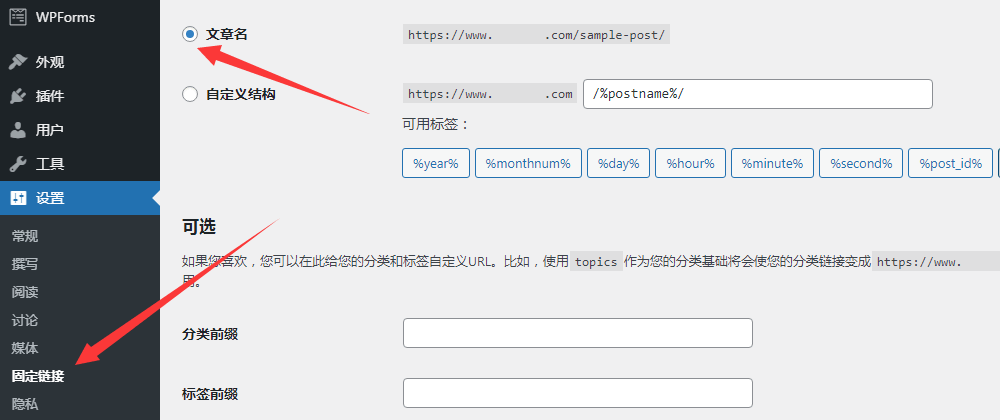
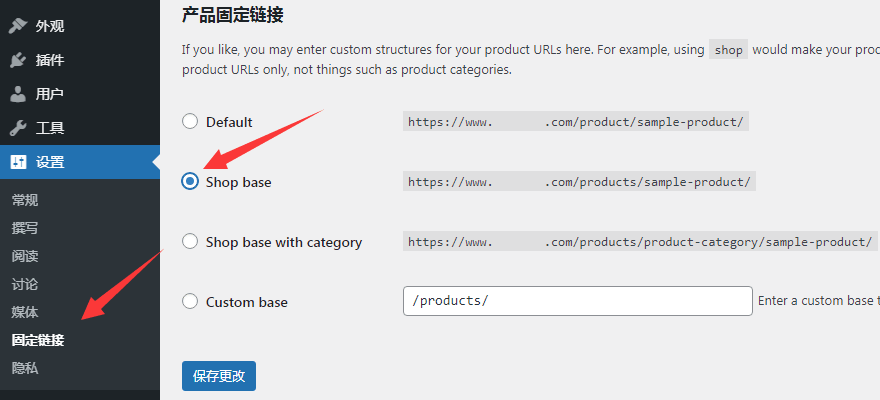
Then,Change fixed connection name,Commonly used settings: select article name,Product fixed connection option Shop base,Save changes。
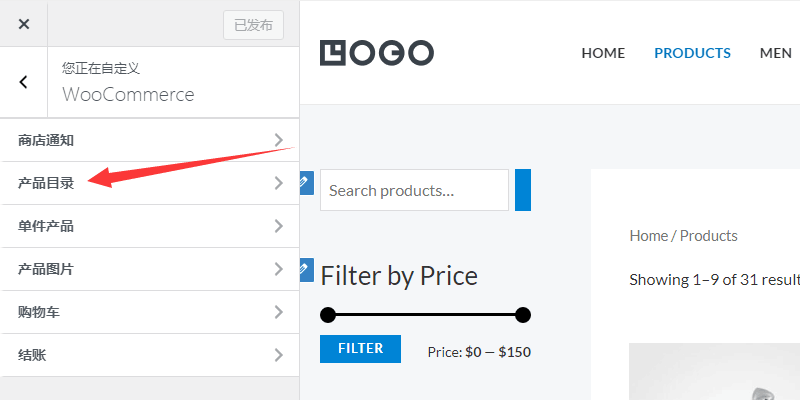
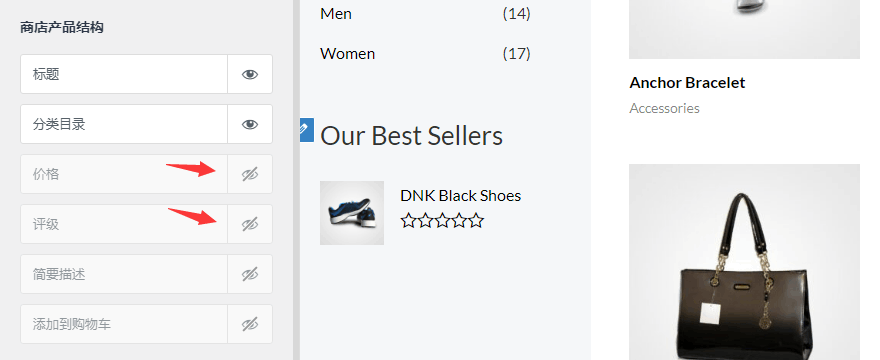
Next,Enter customization options through "Customize",Find the WooCommerce Product Catalog,Turn off display options for prices and ratings。
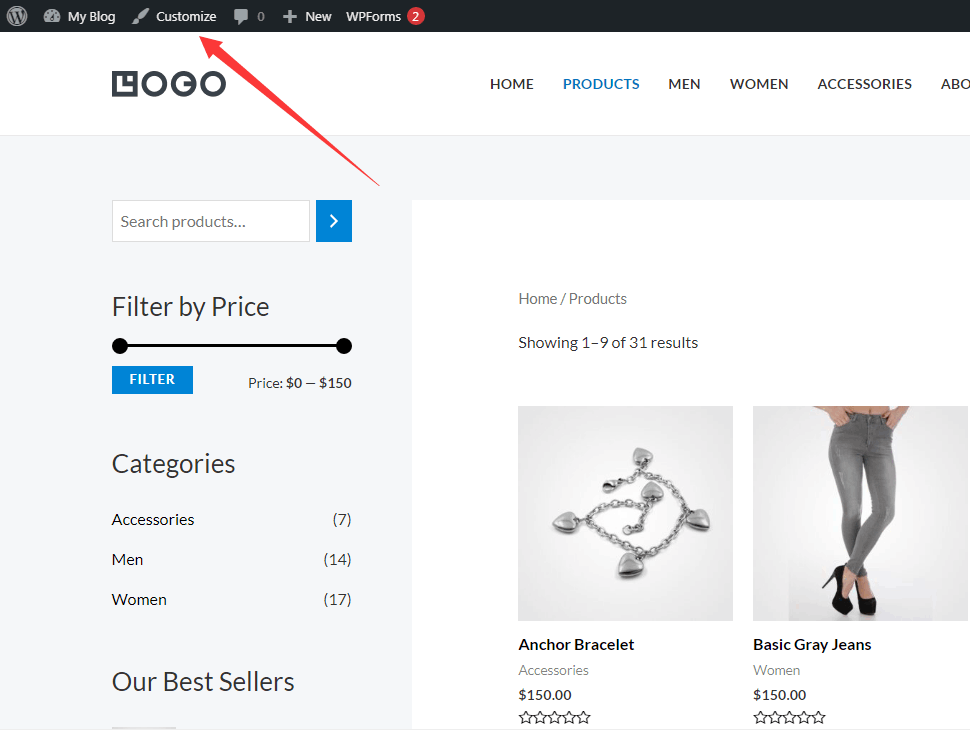
come here,The Products page in the main navigation of the website has been edited.。Next,We edit a single product page。first,Find the product column in the WordPress backend menu,Just find a product to edit。
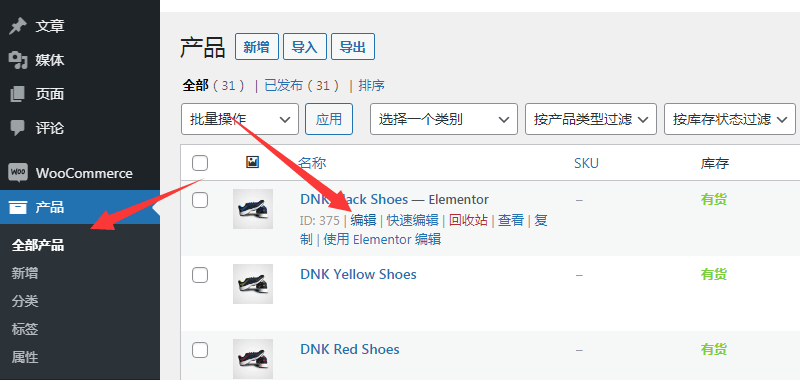
Then,Modify product title,URL and detailed description。Description can be modified using Elementor,Many different elements can be added to it,For example, form,picture,Visual elements such as charts。
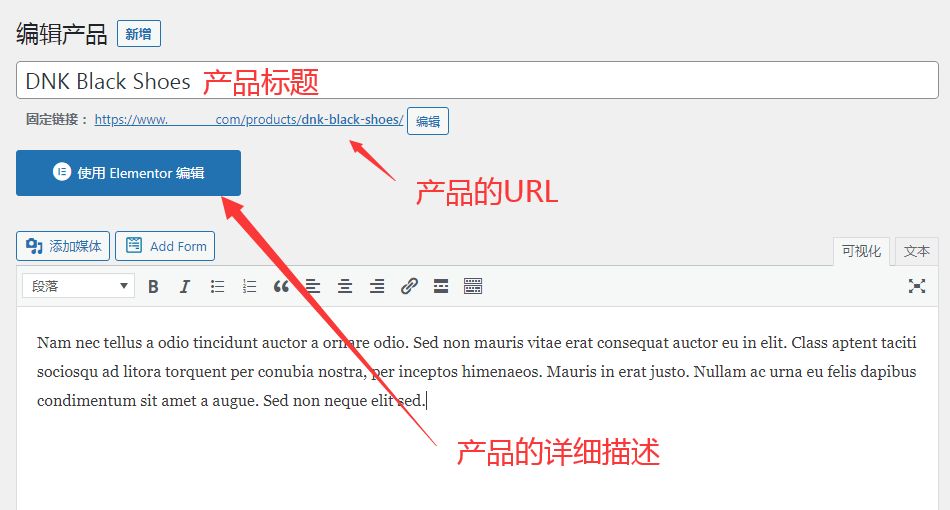
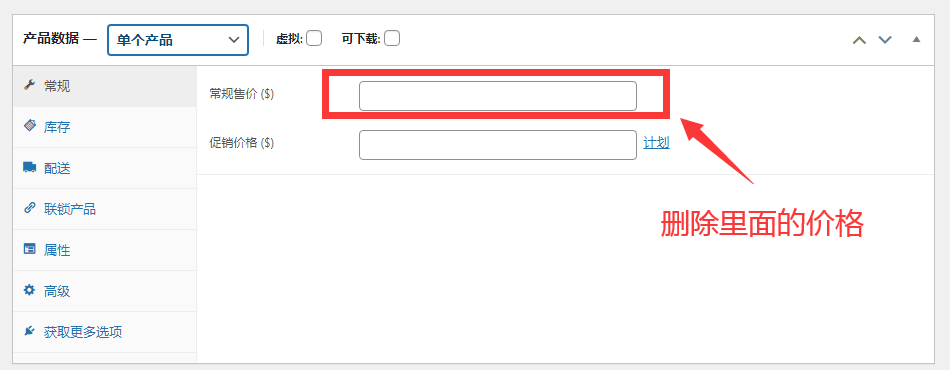
Delete price in product template,The add to cart corresponding to the product page will also be automatically deleted.。
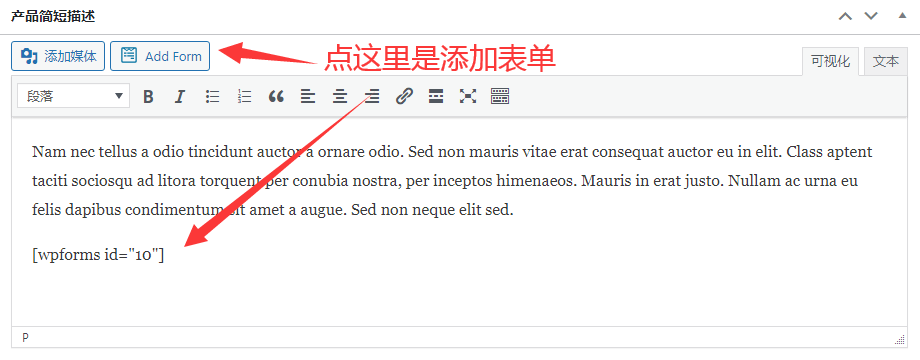
Modify the short description of the product page,You can also add an inquiry form at the bottom。
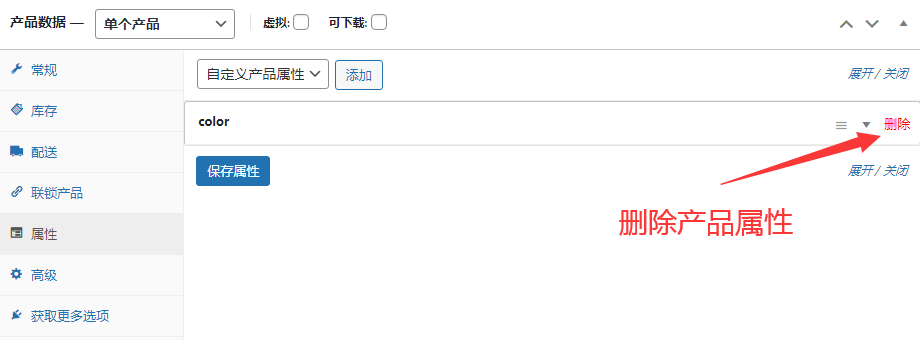
Delete product attributes,Because the detailed description can describe the product better。
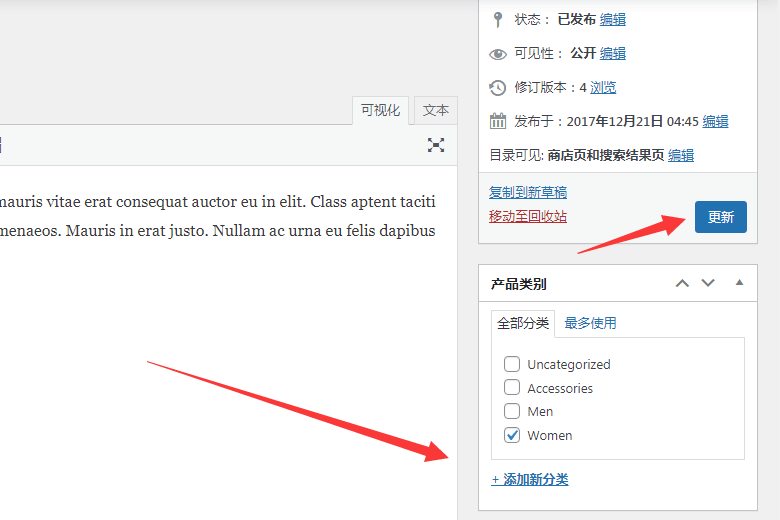
Set product categories,After confirming that it is correct,Click the update button,Publish product page。
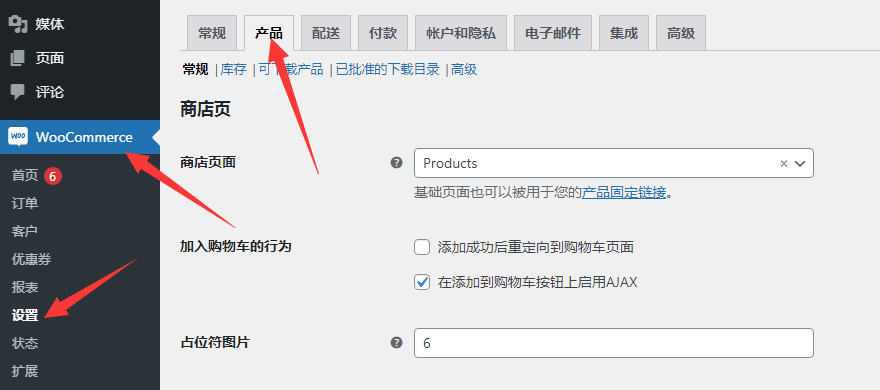
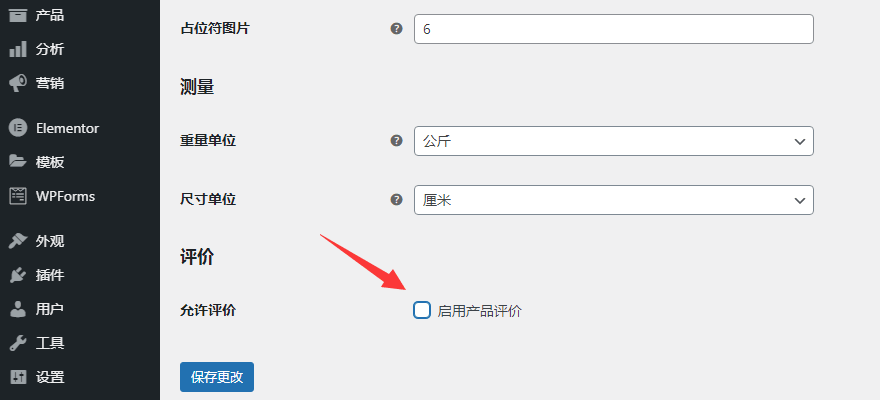
at last,Find the Setup product in the WooCommerce menu,Product reviews are not allowed,Save changes。
Customize Home、About and Contact pages
The homepage of the website looks complicated,Actually there is a shortcut,That's the template for splicing Astra。first,Open the homepage edit page,Click on the Elementor edit button。
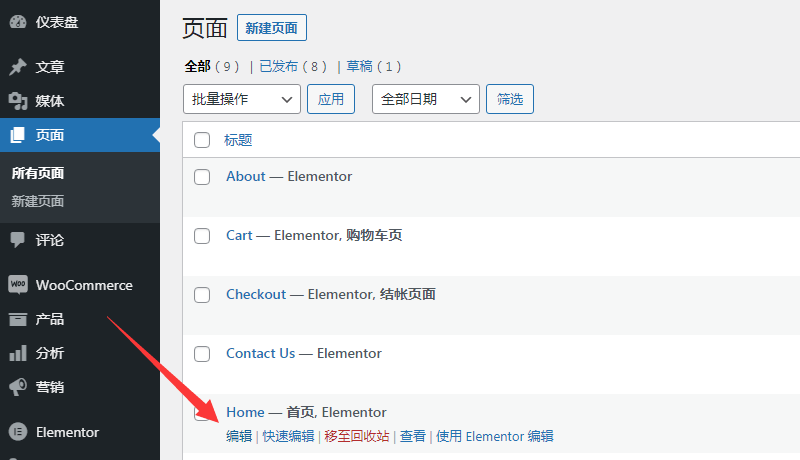
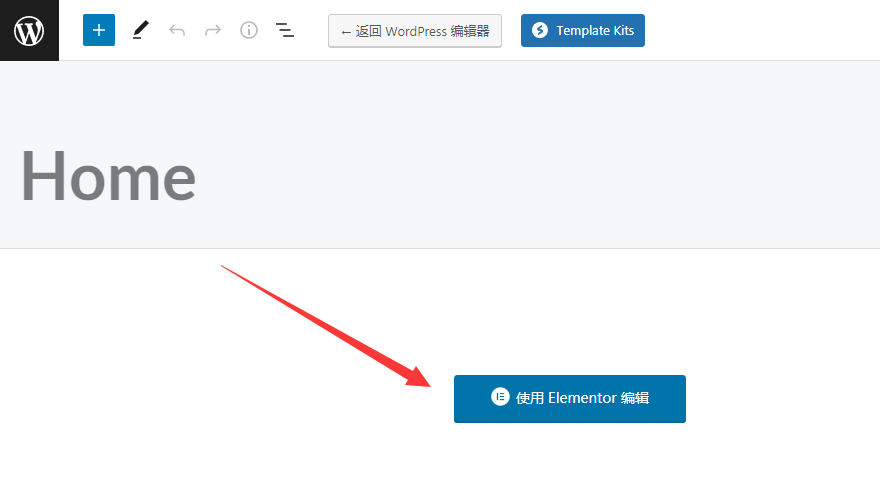
Then,Scroll the page to the bottom,Using Astra’s Template Features,Import the homepage of the Local Business template。
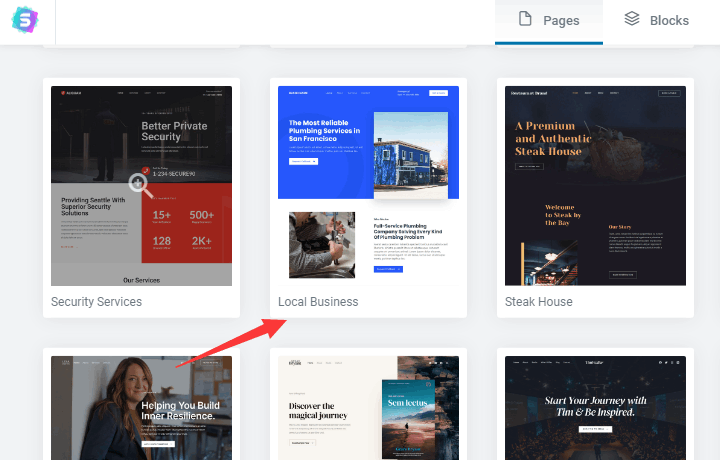
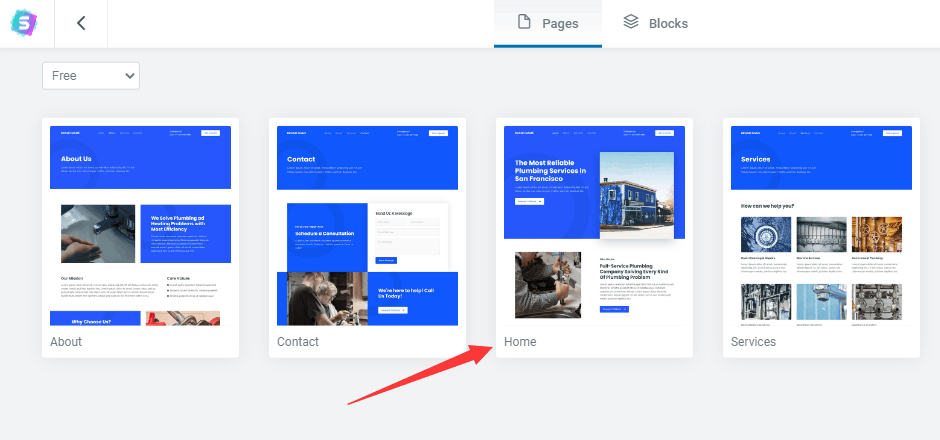
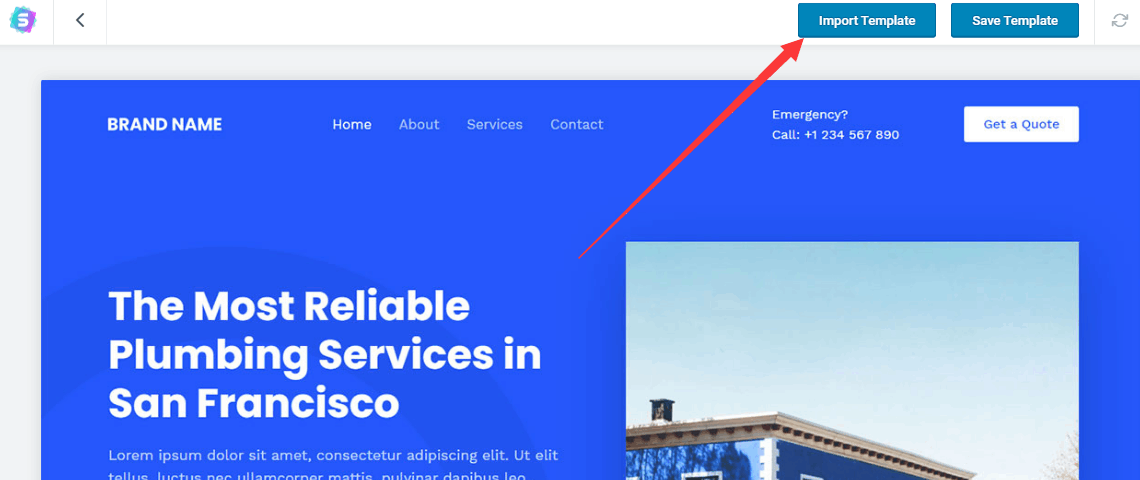
Next,Navigation to find the Elmentor page editor,After deleting the module in the first template Update。
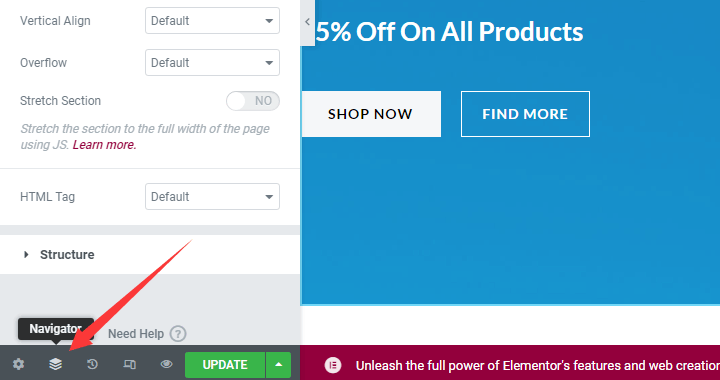
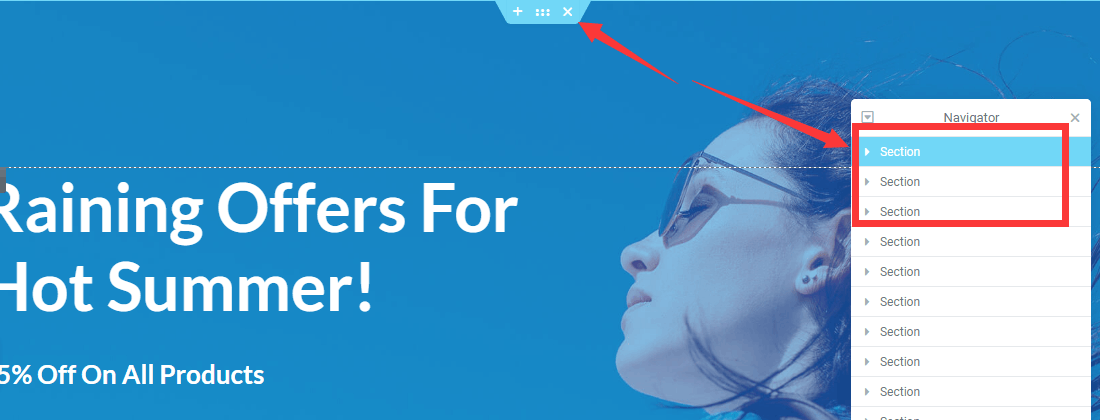
at last,Replace the text and images in the new template with your own。Because Elementor is a visual page editor,The operation is very simple,I won’t demonstrate them one by one here.,If you encounter someone who can’t,Can leave a message。
Website homepage edited,Other pages (such as about and contact) can be edited using the template splicing method I introduced.,The speed of building a website is very fast。
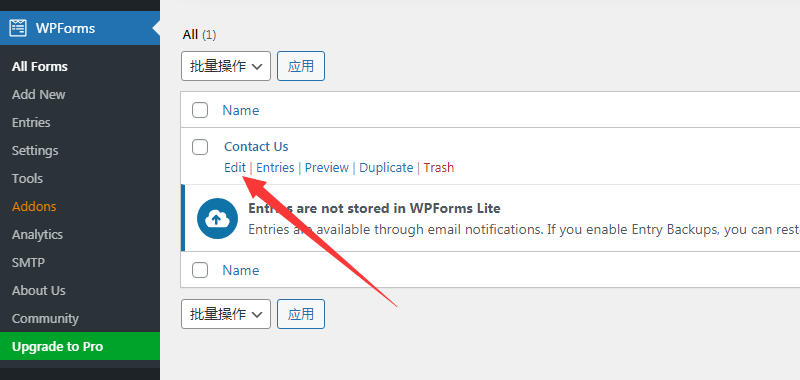
The only thing to note is,The contact page will use the form plugin WPForms。How to use it is to find the pre-built form,After entering, click Settings and Notification,Change the notification email to your own,then save。

Customize Blog Post Page
The blog page is edited differently from the above pages.,You need to go to the page option to create a new Blog page,Publish when completed。
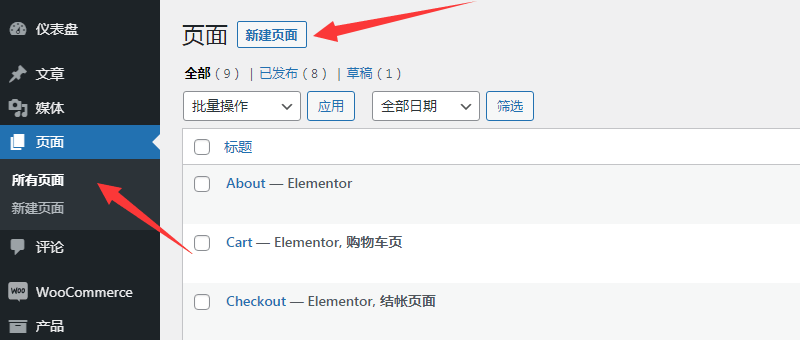
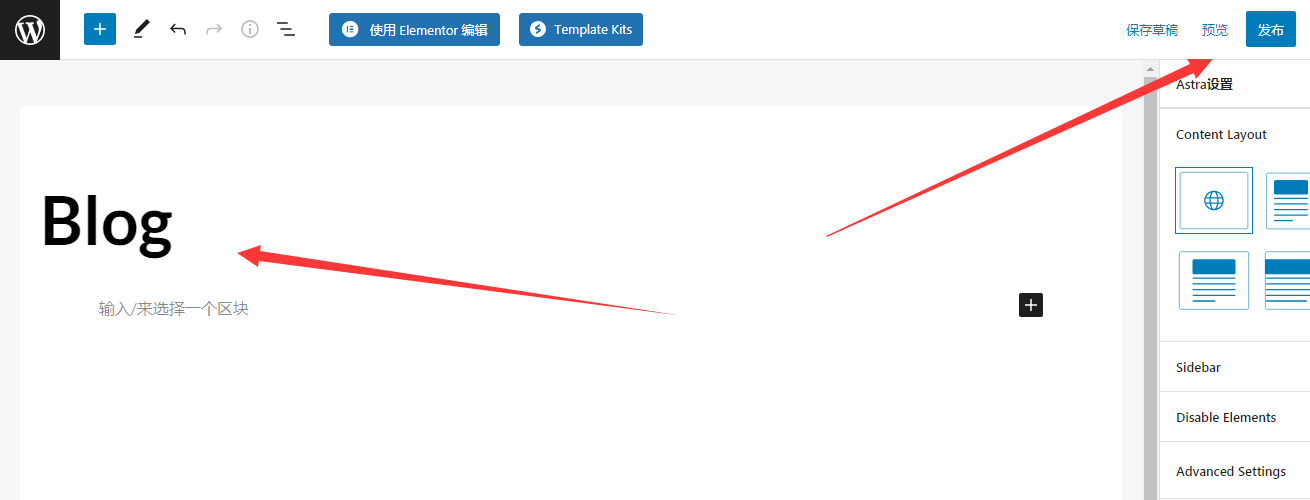
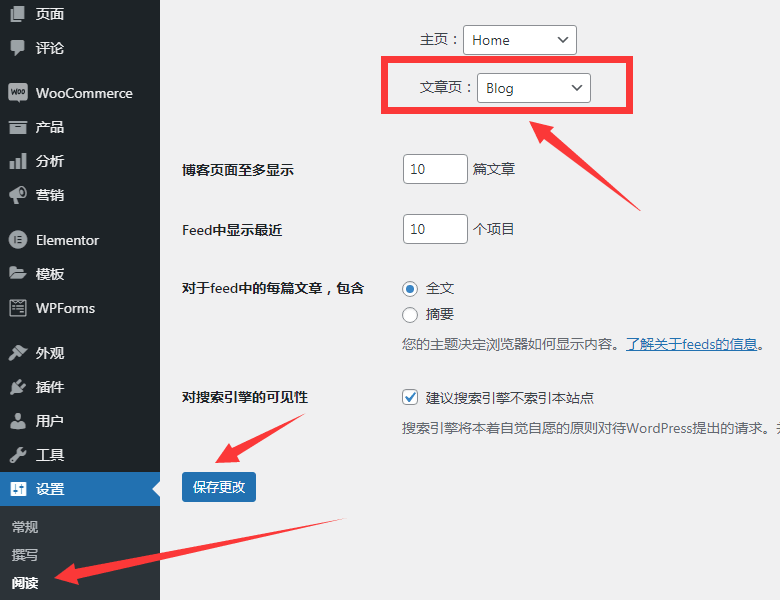
Then,Return to settings in WordPress menu – read,Article page selection Blog,Save changes。
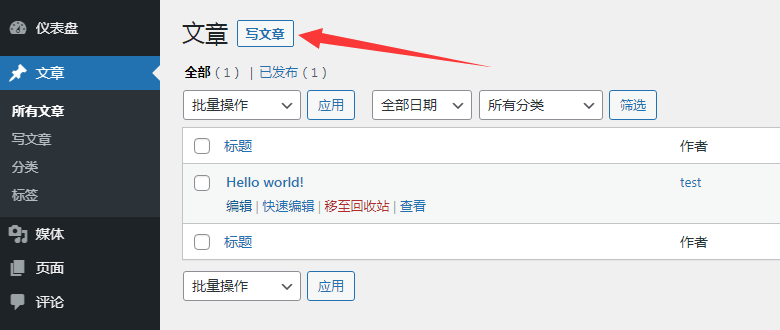
Next,Start writing an article,Post new article,Provide content drainage for subsequent Google SEO optimization rankings。
How to make Mega Menu
1、Activate moduleNav Menu
fromWordPress dashboard > Astra > Astra Pro module > Navigation menuActivate plugin

2、Create Mega Menu
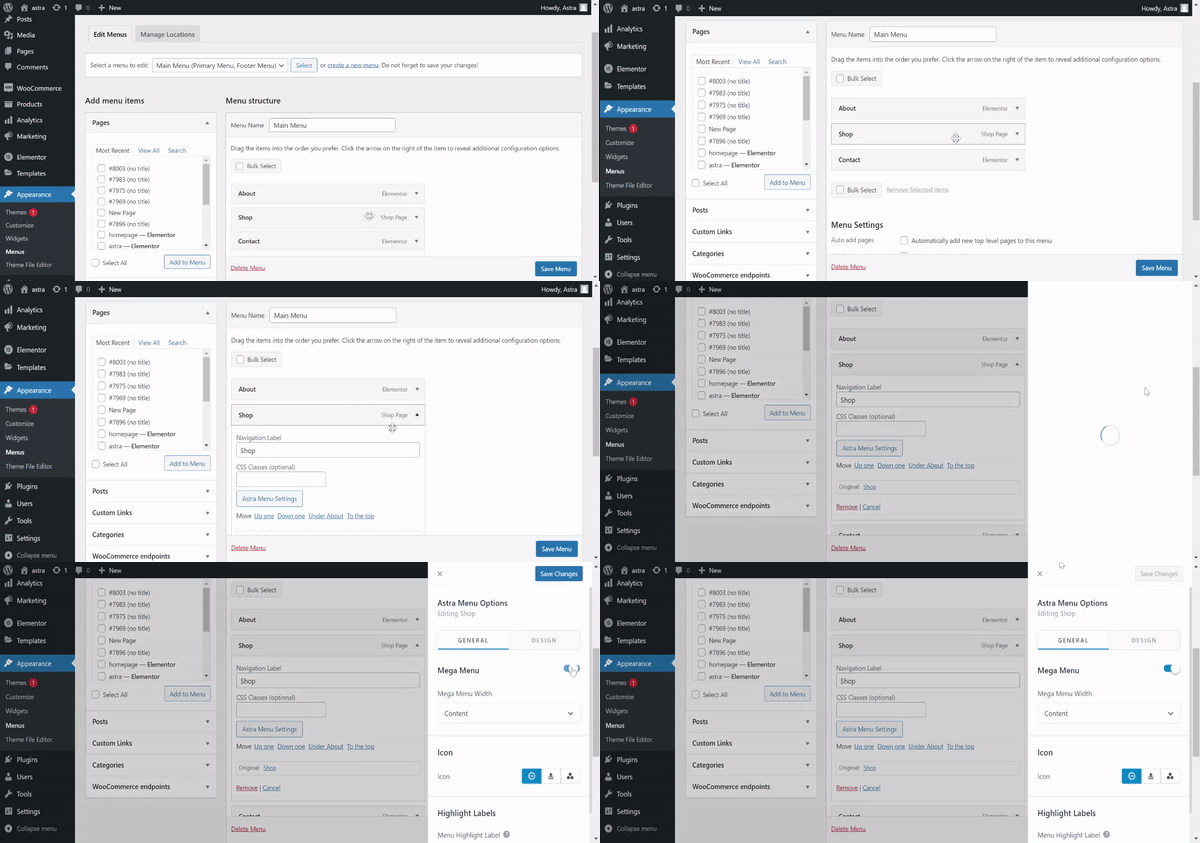
If you want to create a mega menu,You need to enable the mega menu feature for the top-level menu item whose submenu items you want to turn into a mega menu。
Please follow the steps below to do this:
No. 1 step– Navigate to from WordPress dashboardExterior > menu。
No. 2 step– Select the menu item under which you want to add the mega menu。
step 3 – Expand this menu item and clickAstra Menu Settings"button。
![Astra Pro theme website building tutorialateBeginner to Expert (Complete Guide)�� 39 导航菜单模块 [创建超级菜单]](http://cdn.shortpixel.ai/spai/w_698+q_lossless+ret_img/wpastra.com/wp-content/uploads/2023/01/mega-menu-1.png)
- mega menu
- Then,A slide-in popup will open on the right。Enable mega menu toggle button here。This will enable the mega menu option for all submenus of the parent menu。It provides options for top/parent menu。You can set mega menu width to content、menu container or full width。

Mega Menu width meaning:
- content– Set menu width to your content width
- menu container width——Limit the width of the main menu
- full width– Set the width of the mega menu to the width of the screen,but limit menu content to content width。
- Full Width Stretched – Set the width of the mega menu to full width,edge to edge。
- custom width– Set custom width value in pixels
Background color/image
The background color/image will be set to the parent menu's mega menu box。You can use background repeat、Settings such as background size and background position to adjust the background image。
Override the color of this mega menu?
You can set colors for menu items in a parent menu's mega menu box。Available options are text/link color、Text/link hover color、Column separator color。
Highlight tags
This is the text that appears next to the menu item。it highlights the menu。Tags can be free、Promotion、Brand new、Featured etc.。You can set label text and color。
spacing
You can set Margin and Padding for menu items。
3、Mega Menu column settings
usually,We start Mega Menu settings for a certain menu item in the first-level menu directory,Products menu item corresponding to this article。
Second-level menu items added below first-level directory items,The Product Category and Product Gallery corresponding to this article automatically become the two columns of the Mega Menu.。
The third-level menu items added under the second-level menu will automatically become the content in the corresponding column of the Mega Menu.。


4、Expand:How to implement Galley in the second column of Mega Menu
first step:Add a custom link to the secondary menu of the Products menu item
Link is set to #,That is, an empty link

Step 2:Enter Astra Menu Settings to set the content source
Content source selection widget,and select gallery in the widget,and add。

Add pictures to Gallery after adding

Set up the album after adding pictures
Link to:attachement Page represents a link to the associated page where this image is added.
Columns:Setting it to 2 means setting it to 2 columns
Random Order:Check this box to arrange the album randomly.,The order of sorting is different every time it is refreshed.
Size:size of the picture,If you need the picture to be clearer, use full size.。
After adding, save Gallery and return to Astra Menu settings.,Save this Gallery setting,and save Astra menu settings,Exit to menu list。
third step:Save menu settings
After saving, refresh the page to verify the results.。
How to add Elementor template to mega menu?
You can create a mega menu using the Astra theme and the Astra Pro plugin。also,You can also use mega menu templates instead of or in conjunction with text menu items (links)。
This document will show you how to add a template containing WooCommerce product categories to a mega menu using Elementor (Free) and Astra Pro Navigation Menu module。
Notice:This solution is for adding Elementor template to the default header provided by Astra theme。please remember,This only works with Astra's default header and Astra Pro navigation menu modules。If you use the Elementor header instead,then this solution will not apply。
Please follow the steps below:
step 1 – Make sure you have the Elementor plugin and Astra Pro Addon installed and active。in addition,Please make sure to activate the navigation menu module in Astra Settings。
step 2 – Navigate toDashboard > template > add new。
step 3 – in the drop-down menu,Select "Part",Name your template (can be anything;We use "Mega Menu Item 1"),Then click "Create Template"。This will create a new template and open the Elementor editor。

step 4 – In the Elementor editor,Add "Section" and "Shortcode" widgets。Add the following WooCommerce code to the shortcode widget:
This is the WooCommerce shortcode。In this article you canFind more information about it and possible changes in。

Using Elementor Pro,You can use Elementor "Product Category" widget instead of shortcode widget。
Click Publish to save your template。
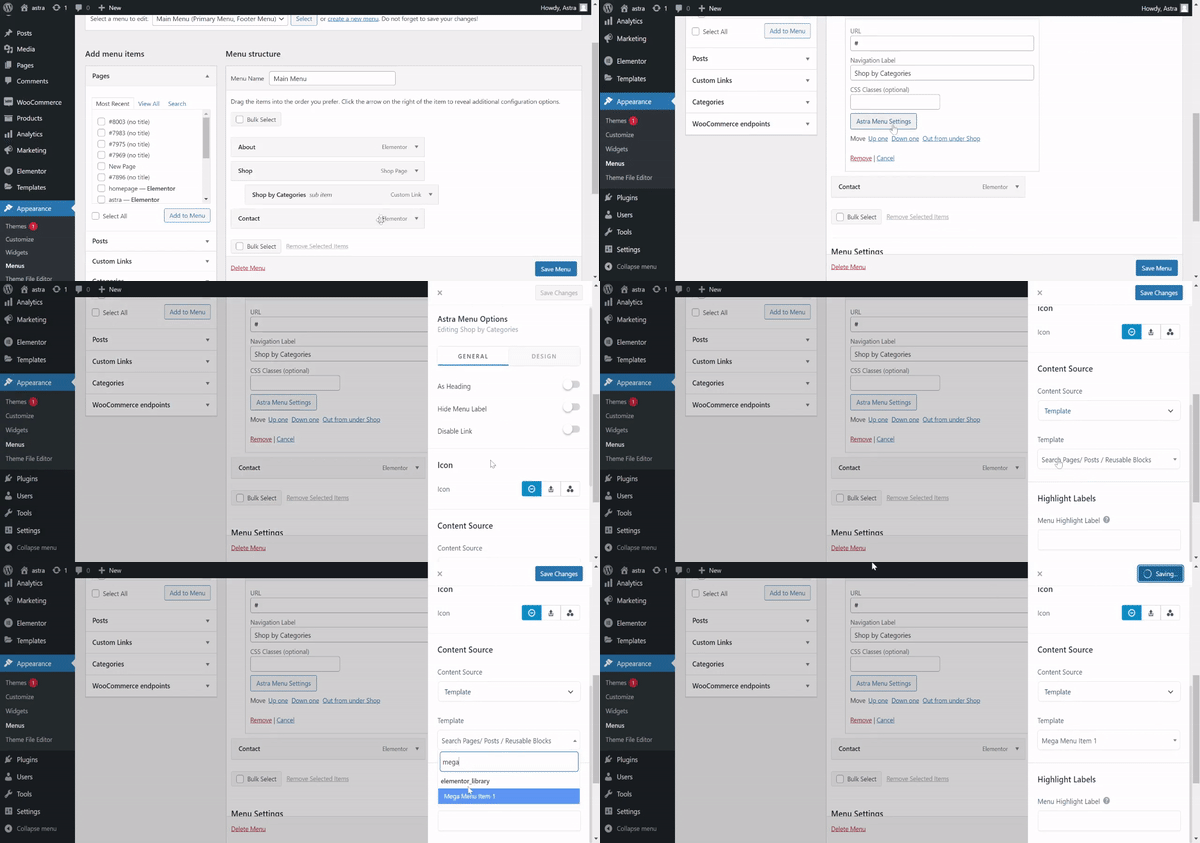
No. 5 step- Now,It's time to create a mega menu。to this end,Please navigate toExterior > menu。Click to expand the menu item under which you want to add the mega menu (let's name this item "Store")。
step 6 - Click "Astra Menu Settings"button,then enablemega menutoggle button。This will create a mega menu under the project。In this step you can alsoStyling a mega menu(width、filling, etc.)
step 7 – next,Add a new menu item under the mega menu (let's name it "Shop by Category"),Then click "Astra Menu Settings"button。
step 8 – In the content source drop-down menu,Select the Template option。in template field,Enter a name for the template and select it from the list。Click Save to add this template to your menu items。
This is what it looks like on the front end。

Summarize
Astra theme as a free theme,The core functions (templates) inside are really easy to use.,Not paid,Comparable to paid。Use template splicing method,Anyone can quickly build a professional WordPress foreign trade website。
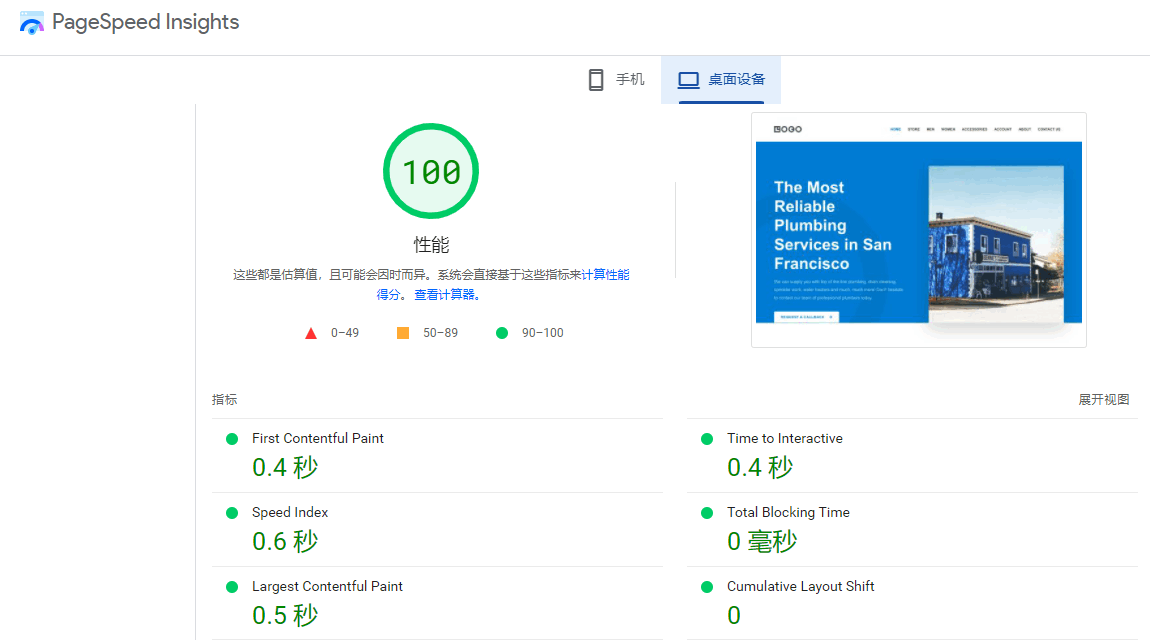
in addition,Use the information introduced in this articleChemiCloud Host foreign trade website building,Optimize your website with the LiteSpeed plug-in it comes with,Google speed test is very fast,Especially suitable for students who want to gain traffic and inquiries through Google promotion。
need to know more,Can view:ChemiCloud Host:Precautions when purchasing、Website building tutorial、Speed test。
